A program by Alan Cashin.
The following text and other files are by (the ‘I’) Alan Cashin.
Here an archive with all sources and binaries and images
I am currently looking through old material that has been in storage for many years. I came across a listing of my ‘instant assembler’ written for the basic KIM-1 with 1kB (plus a bit) memory. It was written in about 1979 to help enter assembler programs, saving the task of converting mnemonics to hex code. The tape with it on is long gone, so I coded it for the acme assembler then ran it in your excellent simulator and it works.
The acme assembler was retrieved from https://web.archive.org/web/20150520143433/https://www.esw-heim.tu-clausthal.de/~marco/smorbrod/acme/ – there is a later version (I believe) in GitHub.
Because there was not much memory, it is small, around 350 bytes (actually smaller as it has an unused block in the middle, which could be the stack if loaded into page 1 or the data bytes if loaded into page 0). It is in 2 parts, a code page around 240 bytes and a set of lookup tables around 100 bytes. It also uses a number of ROM subroutines and it uses the monitor data area as its data area.
It has one failing – no error checking. There was a version that didn’t place the instructions into memory, but passed them to a disassembler. If the original input and the disassembled instruction didn’t match, then it was an error. I don’t have the listing for it.
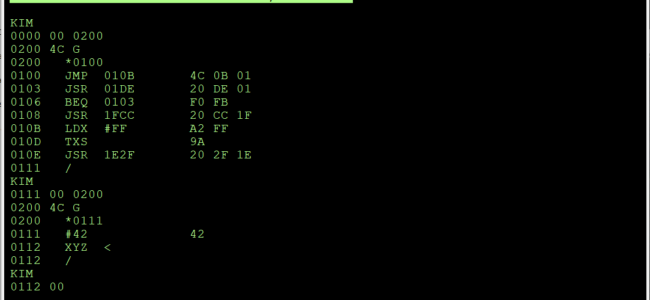
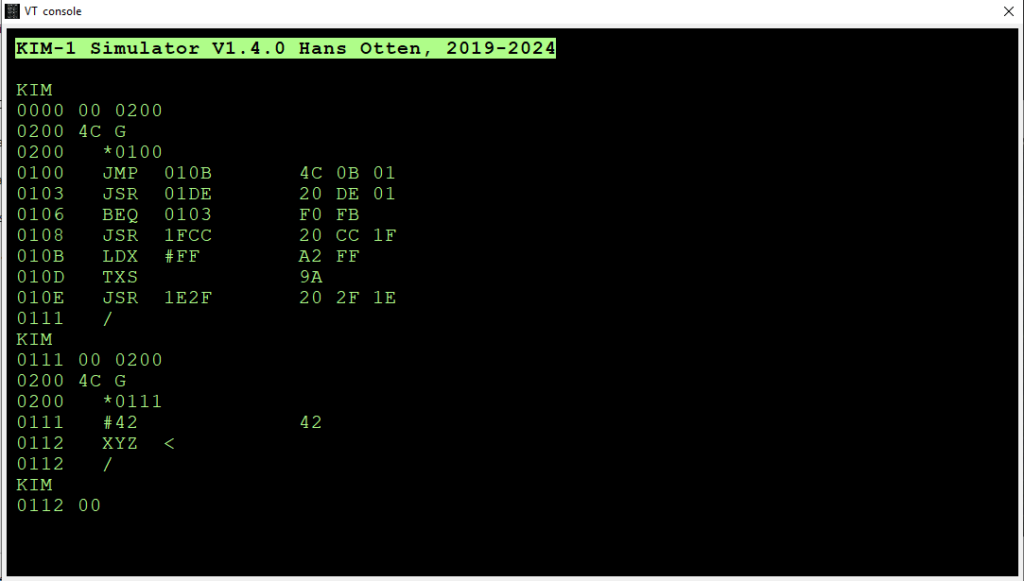
I’ve included a screen shot run in the emulator. The first entry usually is *<4 hex address> otherwise it overwrites itself.
An instruction is entered as mnemonic (e.g. STA). If it is an immediate (TXS PHP etc) the byte is immediately put in memory. If there are different address modes, the cursor moves to accept the operand, entered as
For conditional branches enter the absolute 4 hex address, it is converted to an offset address
The other possible inputs are:
 / ... return to KIM
 < ... cancel this line (after making a typing error for instance)
 #<2 hex> ... a data byte
There may be original documentation but I haven’t found it. I also don’t remember how I got the listings as they were created over 40 years ago. As I recall, I wrote the assembler with the code in page 0 and the tables loaded into the 6530 RAM ($1780 – $17E6). This made sense as people didn’t ordinarily put code in page 0. I found part of a printout with the code in page 0, probably done when the assembler was first entered. There’s also a more complete disassembly that includes the tables, written to load at $2000. I don’t know how that happened as the original KIM-1 purchase didn’t have extra memory. But that is the listing I used to create the source. I didn’t own the KIM-1, it was owned by a group. I bought an Ohio Superboard a year later so did most programming with it.
The assembler is now just a curiosity, there are much easier ways of creating 6502 programs. But in those days the first programs (including the instant assembler) were created in several steps:
1. Write the program as if it were for a proper assembler, with labels for data and program locations.
2. Go through the written version allocating addresses to everything (not hard if one counts in hex and knows the length of the instructions)
3. Substitute real addresses for all the labels
4. Work out relative offsets for all the branch instructions (not so easy)
5. Translate all the op codes to hex (tedious)
6. Enter the hex
7. dump the memory to tape
The instant assembler took the information prepared in stage 3 and allowed it to be entered, so saving steps 4,5,6
The assembler uses tables to convert the mnemonic to a binary op code.
1. Each character of the mnemonic is used to access the character table (25 bytes as Z is not used). Each byte in the table has three components, 2 bits, 3 bits, 3 bits – |cc|aaa|bbb| for the mnemonic abc – these are used to create an index into a second table – the index is aaa000+bbb+cc which yields a unique number between 0 and 61 for each mnemonic. This took a lot of juggling to make work.
2. The number is used as an index to look up the base op code. Implied instructions can only be one byte (TAX, PHA, etc) so the assembler does not expect an operand and goes directly to output the op code
3. For instructions that have an operand, a second index is required. The operand can only have a limited set of characters – , # ( ) X Y or hex. These are given values:
, -> 0 (can be left out)
# or a hex digit -> 1
( -> 2
) or X -> 3
Y -> 4
By adding up the value for each part of the operand, a unique index is created. hh=2; #hh=3; hhhh=4; hh,X=5; hh,Y=6; hhhh,X=7; hhhh,Y=8; (hhhh)=9; (hh,X)=10; (hh),Y=11
Some instructions can have an operand or not (eg ROL). If there is no operand, the index is 0.
There are exceptions so there is more manipulation to get the final index. The index is used to look up a modifier to the base op code to get the final op code.
4. The bytes placed into memory for most instructions are (2+hex digits input)/2. Relative branches are modified. If a data byte is input (using #hh) it is treated like an implied op code.
Also, I have tested the idea of writing the assembler in its own format – the assembler can assemble itself (overwriting itself as it runs). This is using the facility for console input from a file.
I’ve now gone through the source (for the acme cross assembler) and put in a lot more documentation. The cross assembler source could be set up to locate the binary anywhere. For no particular reason it is set up to load at 0x0200.
A simple “Hello World” that can be input to the console after 0200 G – assembles then runs it at 0100
*0100 JSR1E2F LDX#0C LDA0110,X JSR1EA0 DEXBNE0102 JMP1C16 #21#64#6C#72#6F#57#20#6F#6C#6C#65#48/0100 G
The source of the Instant assembler (included in the archive above):
		*= $0200		; set program counter
		!to "org0200.o", plain	; set output file and format
; define some KIM-1 ROM addresses
	open = $1fcc
	crlf = $1e2f
	prtpnt = $1e1e
	outsp = $1e9e
	getch = $1e5a
	getbyt = $1f9d
	prtbyt	= $1e3b
	incpt = $1f63
	pack = $1fac
	gokim = $1c16


	jmp	x200b	; convenience, start address same as load point
x2003	jsr	x20de	; gets a character and calls pack
x2006	beq	x2003	; A=0 it was a hex character, try for another
	jsr	open	; not a hex character, set current location to INL,INH
x200b	ldx	#$ff	; set the stack empty
	txs
	jsr	crlf	; CR LF print the current location and 3 spaces
	jsr	prtpnt
	ldx	#$03
	jsr	x20e6
	stx	$f5	; x=0 on return, initial instruction length
	ldx	#$03
	stx	$f6
x201f	jsr	x20d6	; get a character
	cmp	#'/'
	bne	x2029
	jmp	gokim	; if /, return to monitor
x2029	cmp	#'*'
	beq	x2006	; if *, get a new location
	cmp	#'#'
	bne	x2037	; if #, a data byte
	jsr	getbyt
	jmp	x20a5
; assume it's an instruction - get 3 letters
x2037	tay
	lda	x2100-$41,y ; lookup pattern for character
	and	x215f-1,x ; apply mask for 1st,2nd or 3rd character of mnemonic
	sta	$f6,x ; save
	dex
	bne	x201f
	asl	; a - got 3 characters, create index into instructions
	rol	; a
	rol	; a
	adc	$f8
	adc	$f9
	tax
	lda	x2119,x ; get the basic instruction code
	sta	$f7
	ldx	#$02
	and	#$05 ; work out what type
	lsr	; a
	sta	$f4 ; instruction modifier lookup
	sta	$f5
	bne	*+4
	bcs	x209f ; an immediate - go to output
	pha
	jsr	x20e6
x2061	jsr	x20de
	bne	*+4
	inc	$f5 ; final instruction length
	ldx	#$07
x206a	cmp	x2157,x ; possible operand components (X, Y, brackets etc)
	bne	x2077
	txa
	lsr	; a
	adc	$f4 ; add to modifier lookup
	sta	$f4
	bne	x2061 ; if a legal component was found, get more
x2077	dex
	bpl	x206a ; didn't match, try the next one
	pla
	bne	x2087
; convert absolute to relative address for branches
	lda	$f8
	sec
	sbc	#$02
	sec
	sbc	$fa
	sta	$f8
; some instructions are not consistent - special processing
x2087	ldx	$f4
	lda	$f7
	cmp	#$34
	bne	*+4
	ldx	#$0d
	and	#$08
	beq	x20a0
	cpx	#$0a
	beq	x209f
	cpx	#$05
	bne	x20a0
	dex
	dex
x209f	dex
; modify base code according to address mode
x20a0	eor	x20c8-1,x
	eor	$f7
x20a5	sta	$f7
	lda	$f6
	eor	#$0f
	tax
	lsr	$f5
	jsr	x20e6
x20b1	jsr	outsp
	lda	$f7,x
	jsr	prtbyt
	ldy	#$00
	sta	($fa),y
	jsr	incpt
	inx
	cpx	$f5
	bmi	x20b1
x20c5	jmp	x200b
;
; op code adjustment table
x20c8	!8 $01, $04, $0c, $00, $0c, $08, $10, $10
	!8 $18, $1c, $28, $04, $14, $00

x20d6	jsr	getch
	cmp	#'<'
	beq	x20c5
	rts
x20de	inc	$f6
	jsr	x20d6
	jmp	pack
x20e6	inc	$f6
	jsr	outsp
	dex
	bne	x20e6
	rts
;
	!fill 17
; character lookup table -
x2100	!byte $32, $4b, $60, $97, $77, $00, $00, $00
	!byte $1e, $00, $40, $1c, $00, $3a, $11, $d6
	!byte $c0, $7e, $ad, $c3, $00, $c3, $00, $80
	!byte $c1
;
; base instruction patterns
x2119	!byte $8b, $99, $9b, $44, $ab, $a9, $34, $bb
	!byte $30, $90, $b0, $d0, $50, $70, $10, $01
	!byte $49, $24, $f0, $09, $69, $00, $05, $29
	!byte $c6, $cb, $89, $e6, $e9, $c9, $46, $a5
	!byte $00, $ae, $ac, $c5, $59, $19, $d9, $b9
	!byte $ec, $cc, $00, $85, $e5, $86, $84, $79
	!byte $39, $f9, $45, $00, $25, $06, $00, $00
	!byte $65, $26, $66, $41, $eb, $61
; lookup operand characters
x2157	!byte ',', '#', 0, '(', $ff, ')', 'X', 'Y'
; masks used on data retrieved from character lookup
x215f	!byte $c0, $07, $38
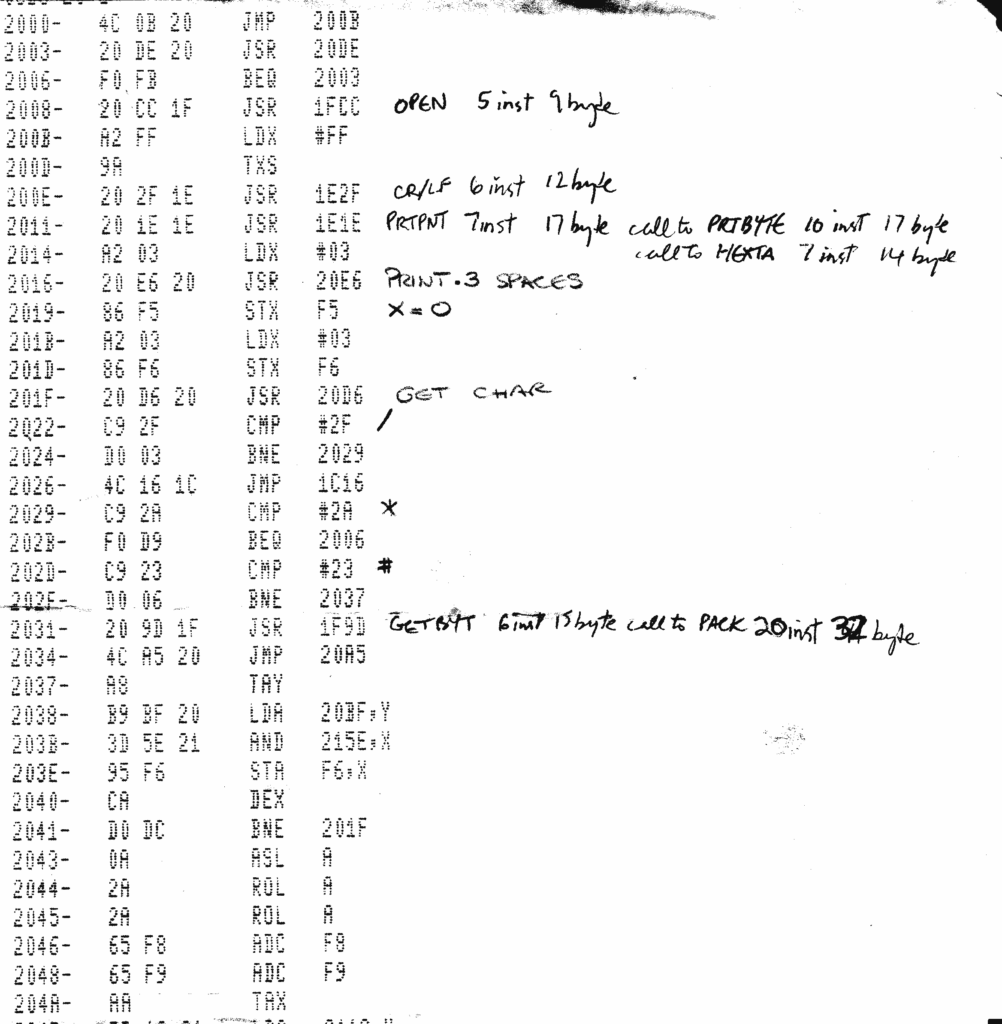
I’ve included a scan of 1 page, the handwritten notes were made a long time ago. I think I was trying to figure the total bytes used including the monitor routines. Is it the smallest 6502 assembler written?