COMPUTE II ISSUE 3 / AUGUST/SEPTEMBER 1980 / PAGE 52
The 1802 Instruction Set
Dann McCreary
Box 16435
San Diego, CA 92116
In case you missed our first column, we took a flight of fancy over the 1802 to survey it's architecture. With this installment we begin a leisurely look at the 1802's instruction set. Where possible, we'll try to compare and contrast 1802 instructions with similar instructions on the 6502.
Before we get rolling, here's an interesting bit of news I got from a certain OEM user of the RCA 1802. They have been delivering 1802 based systems which run at a clock rate of 3.2 MHz. The systems were designed well within RCA's specs for the 1802. They are real-time systems and much of the software developed for them depends on that clock rate. Well, it seems that RCA has since had second thoughts about their 1802 speed spec. They've notified their customers that the 1802 is now only useable at up to 2.5 MHz. Not nice! If any other 1802 users out there feel like victims of the “sting,” I'd like to hear about it.
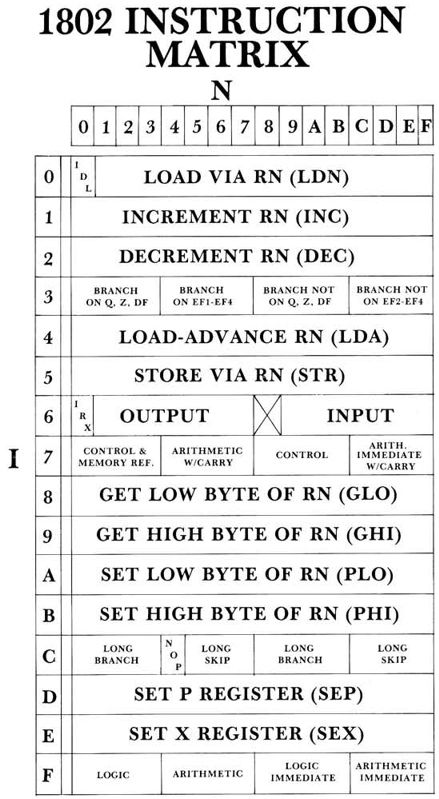
Do you remember the 1802's I and N registers? A large number of 1802 instructions can he readily understood by breaking them down into their I and N components. Generally speaking, the contents of I determine the operation to take place, while the contents of N designate the general purpose 16 bit register to be used or affected. Look at the illustration of the instruction matrix. Each unbroken horizontal area represents an instruction of this type. Even the LDN instruction in the first row is like this except that it is not applicable to R0, since the 00 hex op-code has been preempted for use as the IDL instruction.
Let's take for example a 1C hex. The 1 in the I register says that this is an increment instruction and the C in the N register says that it is to affect RC, one of the 16 bit registers. You could change this to affect any register merely by changing the N portion of' the op-code. (By the way, this kind of consistency across the board makes the 1802 one of the easiest processors to hand assemble code for.) INC performs a true 16 bit increment with rollover such that FFFF hex increments to 0000 hex. It is very much like the 6502's INX and INY instructions except that X and Y are only 8 bit registers. One caution: since the 1802 has no status register, the only way to branch on the result of an INC is to test the register contents by moving them in to the 1802 accumulator, register D. Also note that the 6502 INC lets you increment memory contents but the 1802 INC is strictly for registers. These comments apply as well to the DEC instruction, 2N hex (where N represents any hex digit), but in the opposite direction.
On the 6502 you can load the accumulator (LDA) from memory using a variety of addressing modes. The 1802 gives you LDN (0N hex) which lets you load D with the contents of a memory location, and LDA (Load Advance, 4N hex) which is a LDN and an INC rolled into one. But which memory location does the data come from? The contents of the register designated by RN go out on the address bus, selecting a memory location. Right there, my friend, is what can be one of the more frustrating aspects of programming an 1802 – the only way to access memory is via a register. This implies doing some LDIs (LoaD Immediates, identical in function to the 6502 Immediate Mode) to set up a memory address. Compare these:
| 6502 | ||
| AD 3412 | LDA ADDR1 | ; READ MEMORY |
| 1802 | ||
| F8 12 | LDI A.1 (ADDR1) | ; SET UP |
| B8 | PHI R8 | ; R8 TO POINT TO |
| F8 34 | LDI A.0 (ADDR1) | ; THE DESIRED |
| A8 | PLO R8 | ; MEMORY ADDRESS |
| 08 | LDN R8 | ; READ MEMORY |
Looks pretty bad for the 1802, right?
Well, consider that every time you want to load or store at that memory location with a 6502 it's going to take 3 BYTES. On the 1802, once you've set up the address you can load or store (STR) with only one BYTE. The 1802 LDA instruction also gives you 16 bit auto-indexing memory access with a one BYTE instruction! To do this on the 6502 you would have to set up two page zero memory locations with the starting address and then do a double-precision increment between each memory access. I'll let you figure out how many BYTES that would take you!
In our example we also used PHI and PLO. These instructions transfer the contents of the accumulator, D, to the high or low order BYTE of the register designated by N (RN). The converses of PHI and PLO are GHI and GLO. GHI transfers the most significant BYTE of RN to D. GLO transfers the least significant BYTE of RN to D.
The last two instructions that operate consistently across the board are SEP and SEX. SEP simply takes the contents of N and places them in the P register. You may recall that the 4 bit P register determines which 16 bit register is the current program counter. At system reset, P is forced to zero, making R0 the initial program counter. After initializing some registers, a program might execute a SEP instruction as a simple means of transferring to a subroutine. Let's consider a subroutine with the simple task of toggling the Q flip-flop from its present state to the opposite state. We'll assume that our main program is using R0 as program counter and that the subroutine will be at 1101 hex. Before we can use the subroutine, we must put it's starting address into a register like this:
| F8 11 | LDI A.1 (QSUB) | ; MSB OF ADDRESS |
| B7 | PHI R7 | ; INTO R7.1 |
| F8 01 | LDI A.0 (QSUB) | ; LSB of ADDRESS |
| A7 | PLO R7 | ; INTO R7.0 |
The .1 and .0 notations indicate HI and LO order portions of a register or 16 bit address. Now we can execute this:
| D7 | SEP R7 | ; GO TO QSUB |
When the SEP R7 is executed, R0 is left pointing at the instruction immediately following the SEP R7. So can you guess what our return from subroutine instruction will be? Right, a SEP R0! Here's QSUB:
| 1100 | ||
| 1101 | ||
| D0 | QRET: SEP R0 | ; RETURN TO MAIN PROGRAM |
| CD | QSUB: LSQ | ; IF Q IS SET, SKIP 2 BYTES |
| 7B | SEQ | ; SET Q |
| 38 | NBR | ; SKIP A BYTE |
| 76 | REQ | ; RESET Q |
| 30 00 | BR QRET | ; GO RETURN |
Why is the return at the top? After executing QSUB and branching to QRET, the last thing the subroutine does is execute the SEP R0. As that is executed, R7 is incremented and now points once again to QSUB, ready for the next subroutine call. Please note that only programs using R0 as their program counter may call this subroutine. Incidentally, we used some new instructions here – SEQ and REQ which are considered control type instructions and some branch and skip instructions. The branch instructions are the unconditional branch, BR, and the unconditional branch not, NBR. Unlike the 6502 which provides relative branching, the 1802 only permits absolute branching. Its short branches are much like a 6502 JMP instruction, only the high-order address is whatever is currently in the program counter. Thus you can only do a short branch within the memory page you are already on. Also, when you relocate code in memory, most of the branch addresses must be changed – quite tedious if you are assembling the code by hand. The 1802 does allow unconditional short branches, something that sure would be nice to have on the 6502. The NBR instruction is interesting because it effectively results in a skip and in fact you may wish to use the mnemonic skip rather than NBR. Conditional branches are possible based on the state of Q or DF and also on the zero/non-zero state of D. This includes both short and long branches. The long branches are like the jump on the 6502 but if you are assembling by hand, beware! All 16 bit addresses on the 1802 are specified in normal order, not reversed as on the 6502. Conditional short branches are also possible based on the state of the external flag lines, EFI-EF4. As an exercise, try writing a subroutine that returns a number from 1 to 4 in D, based on which one of four external flag lines is activated. Use the instructions B1, B2, B3, and B4 to branch on the state of the flags.
The LSQ in our example is typical of the Long Skip instructions. If the condition of the skip is met, the next two bytes are skipped. Otherwise, execution continues with the next instruction. Long Skip conditions are the same as for Long Branches, with the addition of LSIE which permits testing the state of the interrupt enable flag, IE.
Finally, we come to the instruction we've all been waiting for – SEX! Obviously the designers at RCA are not your staid, single-minded, no-nonsense engineering types at all. They appear to enjoy mixing a little fun in with their work! Setting X, from which the infamous mnemonic is derived, simply puts the value of N into the X register. A number of the instructions we have yet to look at interact with the memory location pointed to by the 16 bit register designated by X. We'll refer to that register as RX.
LDX is like LDN. It loads the contents of memory pointed to by RX into D. LDXA is to LDA as LDX is to LDN. STXD is like a STR, but instead of storing D via RN, it stores D at the location pointed to by RX and decrements RX to boot. Now if they had only included a load via X and decrement, and a store via X and advance (LDXD & STXA) the 1802 would have been much more versatile! Oh, well. So much for memory reference via RX.
The 1802 gives you a handful of arithmetic operations that let you subtract or add the contents of memory and D. Unlike the 6502, the 1802 gives you the option of excluding the carry (DF) from the operation. Thus, you can add without first clearing the carry and subtract without first setting the carry. Arithmetic can also be done using the immediate byte, allowing you to add or subtract fixed values.
The logical operators used VIA RX are AND, OR and XOR (Exclusive OR). They work much like their 6502 counterparts. They may also be used in immediate mode. D may be operated on also with the SHR, SHRC, SHL and SHLC. These are identical to the 6502 LSR, ROR, ASL and ROL commands, in that order except that they apply only to shifting the accumulator.
Input and output instructions are also intimately related to RX. To output a byte of data, you must first store it at the memory location pointed to by RX. RX is also incremented when the OUT is executed, making this handy for outputting messages from buffers. Using INP inputs a byte into D, but be careful! It also gets stored VIA RX. Be sure RX is pointing where you want it. When doing an Input or Output, the N lines on the 1802 chip are set to match bits 0, 1 and 2 of the contents of the N register. This makes I/O decoding in hardware somewhat simpler than the 6502 memory-mapped only approach.
IRX increments the X register. It is really a vestigial out instruction but no output is defined when N = 0. Note also that what might have been an INP 0 (68 HEX) is the one undefined 1802 op-code. It is now used on the recently released 1804 to add some features and correct some 1802 deficiencies.
Well, we've looked over all but a handful of the 1802's 255 instructions. All that are left are some control instructions with some relatively obscure or involved applications. We'll discuss them in later columns as we apply them. Meanwhile, try converting some 6502 code into 1802 code for practice. And let me hear some comments! I can be reached at Box 16435, San Diego, CA 92116.